|
RaidenMAILD Help
- Server settings -
There are several server settings here. They are Server, Domain, Resend mechanism, SMTP&POP3 setup, Log setup, MultiPOP, Anti-Spam and Preference.
Server
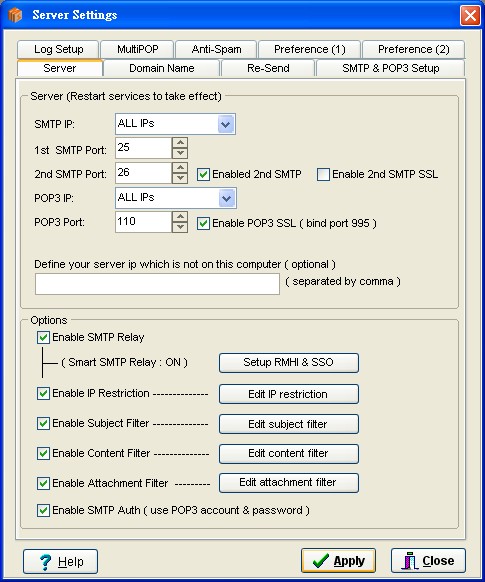
In the Server panel, you could determine server's IP Address, internet IP Address and configure some essential options.
SMTP IP
You could select [ALL] to bind SMTP service on all IP addresses or select a single IP to bind.
1st SMTP Port
SMTP Service standard port is 25 port. Its domain list is [Primary domain List].
2nd SMTP Port
SMTP2 service default port is 26 port. The is the second SMTP service of RaidenMAILD. Its domain list is [Secondary Domain List].
POP3 IP
You could select [ALL] to bind POP3 service on all IP addresses or select a single IP to bind.
POP3 Port
POP3 Service standard port is 110 port.
Enable POP3 SSL
This option will start the POP3 SSL service and the service port will be on 995 port. If user wanna retrieve mail via this secured channel, he should enable corresponding option in his mail client to connect to POP3 SSL 995 port.
Enable SMTP Relay
This option will enable SMTP Relay which means server will allow smtp request to send mail to third party domain.
In order to prevent unauthenticated user to use your server to relay mail for unsolicited mail purpose, the settings is suggested
to be [Enable SMTP Relay] and [Enable IP Restriction] and [Keep the IP Allow List empty], when you done these three settings, it will enable Smart SMTP Relay.
Smart SMTP Relay is a feature that will grant user relay permission by checking mail with POP server. As long as user checked his mailbox for new mail, his IP address will be granted relay permission for one hour period. The features is also called POP before SMTP, you may see it in other mail server softwares.
Enable IP Restriction
This option will enable IP restriction. if it is enabled, the IP Allow List and IP/Domain Deny List will be enabled, too.
RMHI SSO 設定
This option will enable the RaidenMAILD Http Interface service. With this service, RaidenWebMail ISAPI will be able to interact with RaidenMAILD. If you want to install RaidenWebMail ISAPI package, you need to have this option enabled first. Not only for WebMail ISAPI to interact but also it provides Single Sign-On feature for Smart SMTP Relay.
Enable subject filter
This option will enable subject filter. Subject filter will check mail SUBJECT for anti-spam or anti-virus issue. Administrator could determine how to process spam mail, such as (1)delete it or (2)move it or (3)mark ir warning string to it subject or (4)move it to unsolicited folder..etc.
ps: subject filter supports PCRE.
Enable content filter
This option will enable content filter. Content filter will check mail RAW DATA for anti-spam or anti-virus issue. Administrator could determine how to process spam mail, such as (1)delete it or (2)move it or (3)mark ir warning string to it subject or (4)move it to unsolicited folder..etc.
ps: content filter supports PCRE.
Enable attachment filter
This option will enable attachment filter. Attachment filter will check the attachment file name. Administrator could determine how to process spam mail, such as (1)delete it or (2)move it or (3)mark ir warning string to it subject or (4)move it to unsolicited folder..etc.
Enable SMTP AUTH
This option is recommended. It could let your user to enable his SMTP option "My server needs authentication" in his mail client to relay mail to third party domain.
Domain
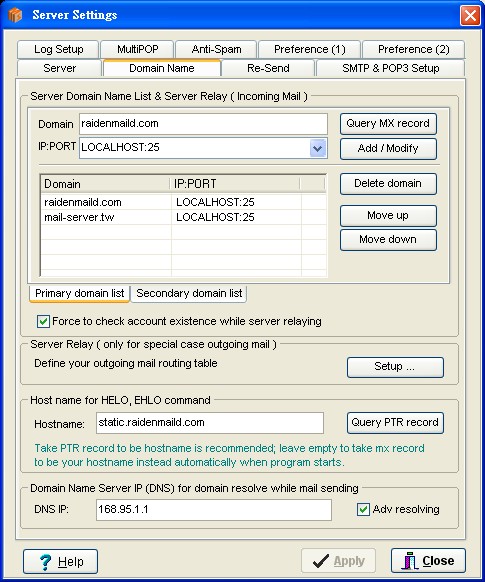
Mail domain is necessary setting. Administrator needs to input domain to host its mail. It needs at least one domain in the list.
Domain
Mail domain. It means the string after "@" character of email address.
IP:PORT
This is incoming server relay setting, it determines which IP:PORT is the destination for the domain. You could determine a domain's destination to LOCALHOST or other IP Address. Default value is LOCALHOST:25, it means the domain destination is this local mail server, thus, mail will be stored in local disk.
You also could integrate anti-virus gateway software by this incoming server relay. The tutorial is here. If you don't have to relay incoming mail to other SMTP server, generally, just setup the IP:PORT to be LOCALHOST:25.
Domain list
There are 2 domain lists here. Primary domain list (for 1st SMTP) and secondary domain list (for 2nd SMTP).
Server relay (Only for special case outgoing mail)
The SMTP routing table has 2 purposes.
1) Relay mail to other SMTP to send: When some domains didn't accept your mail directly (such as your IP Address was denied...etc), you could setup this option to relay mail to other SMTP to send mail to remote domain, most cases, you could setup your ISP SMTP Server to relay mail
2) Cache for some domain MX record: You could predefine some domain MX records to save some loading while query domain MX record.
Host name for HELO, EHLO command
This value is for server to says hello to remote host. Recommend value is your PTR record of IP Address, if you didn't have PTR record, you may use your MX record instead. The value also should be FQDN format.
Domain Name Server IP (DNS) for domain resolve while mail sending
When raidenmaild sends mail to outside domain, it will query domain info from this DNS. Thus, the DNS should be open query. If you didn't know what value you should input, please leave it blank, it will take 168.95.1.1 as default DNS.
Adv resolving means it will attempt to resolve every MX record's IP address to send mail. This will have better result for mail sending but spend more time with domain resolving.
Re-send mechanism
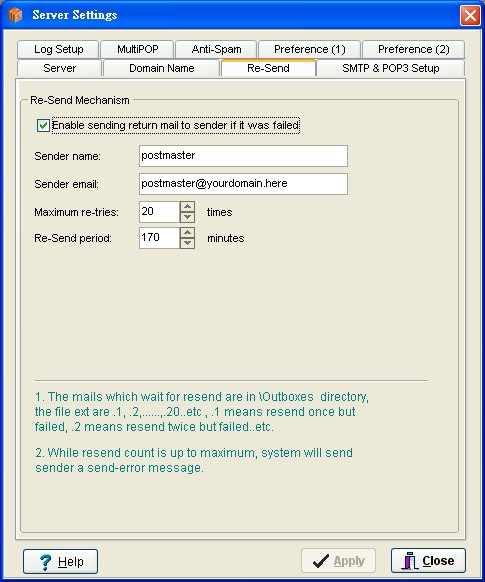
Re-send mechanism will re-send the queued mail till it was sent successfully or announced the failure. If the sending is announced as a failure, system will send a undeliverable message to sender.
Enable sending return mail to sender if it was failed
This option will enable system to send the return mail or not. If you are going to send bulk mailings, you may not wish to get lots of return mails.
Sender name
Default display sender name of system mail. Recommend is postmaster.
Sender email
Default sender email of system mail. Recommend is postmaster@Domain. Of course, you should create this postmaster account first.
Maximum re-tries
The maximum number of re-tries for a undeliverable mail. When a mail was accounced as failure, system will send a undeliverable message to sender to acknowledge him.
Re-send period
The time duration between two re-send calls.
PS: the queued mails are in <RaidenMAILD>\outboxes directory.
SMTP & POP3 setup
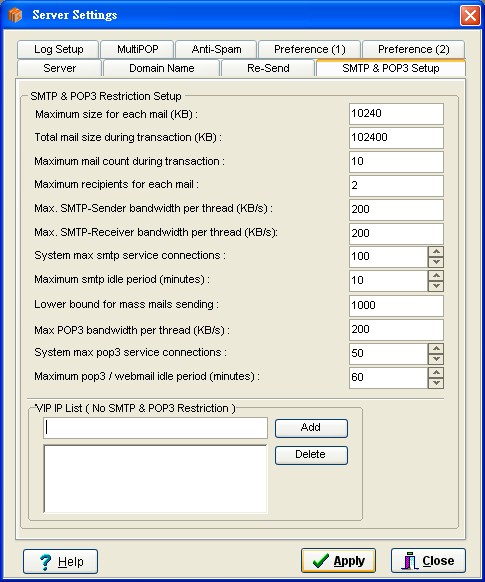
SMTP & POP3 setup has lots of rules for user to obey while they are using SMTP & POP3 server.
Maximum size for each mail (KB)
Mail size should not be larger than this value, or system will reject the request.
Total mail size during transaction (KB)
During a transaction, the total mail size should not be larger than this value, or system will reject the request.
Maximum mail count during transaction
During a transaction, the total mail number should not be larger than this value, or system will reject the request.
Maximum recipients for each mail
The recipients number should not be larger than this value, or system will reject the request.
Max. SMTP-Sender bandwidth per thread (KB/s)
The maximum bandwidth speed for each outgoing smtp connection (KB/s).
Max. SMTP-Receiver bandwidth per thread (KB/s)
The maximum bandwidth speed for each incoming smtp connection (KB/s).
System max smtp service connections
The maximum smtp service connections simultaneously (including incoming & outgoing threads).
Maximum smtp idle period (minutes)
This determines how long could smtp connection idle online.
Lower bound for mass mails sending
While recipient number is larger than this value, system will divide recipients into several parts and generate several outgoing threads simultaneously to handle these sending jobs.
Ex:
Suppose the total number of mails is T and the lower bound of mass mails sending is N and T is larger than N.
The system will divide T into (T/N) parts to send these mails at the same time. There will be (T/N) smtp-sender threads activated to process N mails separately and simultaneously. However, MAILD only generates (T/N)*2 files in \Outboxes directory instead of T files.
Therefore, you should notice that if the smtp-sender thread number is larger than system smtp service connection number, your mail server will not be able to receive anymore smtp connection. Thus adjust your max smtp connection settings carefully for your bandwidth.
Max POP3-Receiver bandwidth per thread (KB/s)
The maximum bandwidth speed for each pop3 connection (KB/s).
System max pop3 service connections
The maximum pop3 service connections simultaneously.
Maximum pop3/Webmail idle period(minutes)
You can specify maximum time duration of idle period when user is using your POP3 or Webmail.
VIP IP List ( No SMTP & POP3 Restriction )
Administrator could determine which IP Address is VIP user.
LOG setup
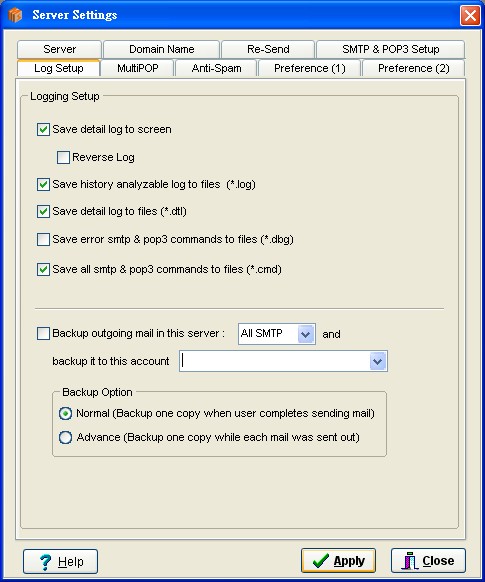
Log setup could record server actions to files.
Save to Screen for details
Save event log to the main screen.
Reverse log
If it is enabled, the latest log will be on the top.
Save history analyzable log to files (*.log)
Save event log to YYYYMMDD.log in specific format, this YYYYMMDD.log is for log analyser to make list and chart.
Save detail log to files (*.dtl)
Save detail log to YYYYMMDD.dtl.
Save error smtp & pop3 commands to files (*.dbg)
Save every error smtp & pop3 command to YYYYMMDD.dbg. Debug file helps administrator to find out any suspicious actions.
Save all smtp & pop3 commands to files (*.cmd)
Save every smtp & pop3 command to YYYYMMDD.cmd.
Backup outgoing mail in this server [] backup it to this account []
This option will setup which smtp server will backup outgoing mail and backup to which account.
Backup options
- Normal : This option will backup outgoing mail once while the user sends mails (only one mail copy).
- Advanced : This option will backup outgoing mail once while the mail is sent successfully to recipient's mailbox (maybe multiple mail copies).
MultiPOP
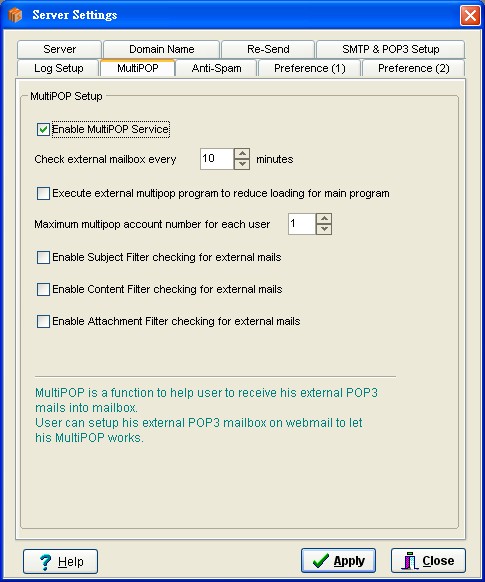
MultiPOP provides your server to receive mails from users' external pop3 mailboxes.
Enable MultiPOP Service
Enable MultiPOP to receive external mailbox mail. User needs to setup his pop3 account info on webmail.
Check external mailbox every [nn] minutes
MultiPOP engine will check the external mailboxes every [nn] minutes.
Execute external multipop program to reduce loading for main program
This option could activate external multipop program to instead of multipop engine of main program.
Maximum multipop accounts for each user
Personal version provides 1 account only; commercial version provides 10 accounts.
Enable subject filter checking for external mails
Doing the subject filter checking for the external mail.
Enable Content filter checking for external mails
Doing the content filter checking for the external mail.
Enable Attachment filter checking for external mails
Doing the attachment filter checking for the external mail.
Anti-Spam
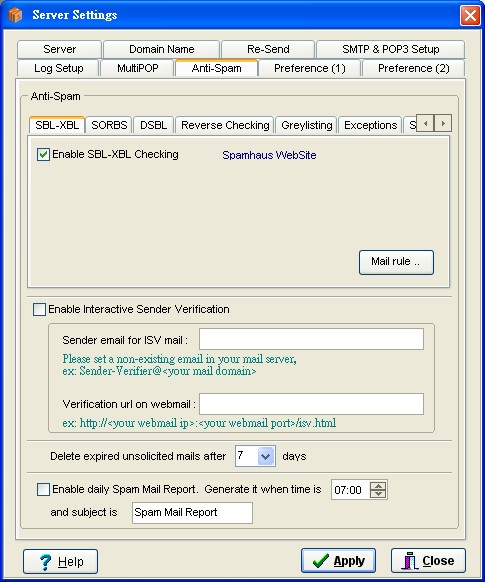
There are several anti-spam mechanisms helping users to fight spam, such as RBL checking, REVERSE (SPF, PTR) checking, Greylisting, Interactive Sender Verification.
Enable SBL-XBL checking
RBL database. Official site is http://www.spamhaus.org
Enable SORBS checking
RBL database. Official site is http://www.au.sorbs.net
- Deny those IPs if they are Open Relay
- Deny those IPs if they are Spammer IP
- Deny those IPs if they are Dynamic IP Address
Enable DSBL checking
RBL database. Official site is http://dsbl.org
Enable Reverse Checking checing
This mechanism will resolve sender's domain to get all IP addresses related to his domain first, if sender IP address is not in one of them, it will be treated as spam mail.
It has four comparison levels, from low to high are:
Suppose sender IP Address is 1.2.3.4
- Level A:
Take CLASS A IP of IP Address to do comparison, ex: 1.*.*.*
- Level B:
Take CLASS B IP of IP Address to do comparison, ex: 1.2.*.*
- Level C:
Take CLASS C IP of IP Address to do comparison, ex: 1.2.3.*
- Level D:
Take IP Address to do comparison, ex: 1.2.3.4
For example:
- for Level B comparison, 65.54.252.149 is the same as 65.54.149.88 (only compare 65.54 )
- for Level C comparison, 65.54.252.149 is the same as 65.54.252.88 (only compare 65.54.252 )
Enable overall checking on 1st SMTP service
This option is only workable while you enable 2nd SMTP service. When you enable 2nd SMTP service, 2nd SMTP service is always for your user to use and 1st SMTP service if only for receiving incoming connections. Thus, Its purpose is to check 1st SMTP connection with reverse mechanism and reject any connection which declare it is your domain user (fake user), because user's corresponding SMTP service is 2nd SMTP service. It is policy issue.
Enable PTR Checking checking
This mechanism will check PTR record of sender IP Address. If the PTR record is different from its hostname, the mail will be treated as spam.
Enable Greylisting checking
Greylisting will temporarily reject any email from a sender it does not recognize. If the mail is legitimate, the originating server will most likely try again to send it later, at which time the destination will accept it. If the mail is from a spammer, it will probably not be retried.
It has four comparison levels, from low to high are:
Suppose sender IP Address is 1.2.3.4
- Level A: Take CLASS A IP of IP Address to do comparison, ex: 1.*.*.*
- Level B: Take CLASS B IP of IP Address to do comparison, ex: 1.2.*.*
- Level C: Take CLASS C IP of IP Address to do comparison, ex: 1.2.3.*
- Level D: Take IP Address to do comparison, ex: 1.2.3.4
For example:
- for Level B comparison, 65.54.252.149 is the same as 65.54.149.88 (only compare 65.54 )
- for Level C comparison, 65.54.252.149 is the same as 65.54.252.88 (only compare 65.54.252 )
PS.1: When anti-spam mechanism is enabled, connection will be checked by corresponding rules, including legitimate users. Thus, a ligitimate user needs to know how to send a ligitimate mail, avoid to be treated as spammer. Here are several ligitimate sending:
- User's IP address is in IP Allow List
- Through Smart SMTP Relay (POP before SMTP)
- Through SMTP Authentication
- Sender email is in recipient's whitelist or addressbook
- The sending is on localhost
PS.2: When REVERSE checking and PTR checking are both enabled, if incoming connection passes one of these 2 mechanisms, it will not be treated as spammer.
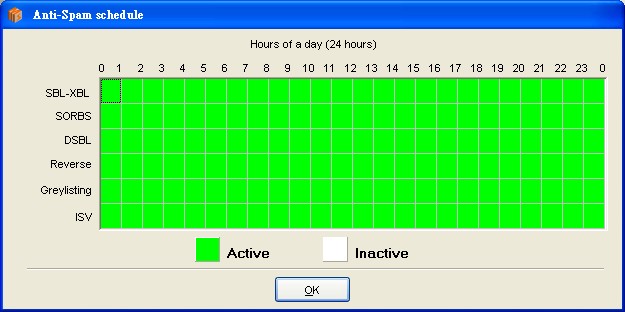
Anti-Spam Schedule
You can schedule anti-spam mechanisms.
Ex: Set SBL-XBL checking to work 24 hours a day, set Greylisting to work from 08:00 to 18:00, set ISV to work from 18:00 to 24:00...etc.
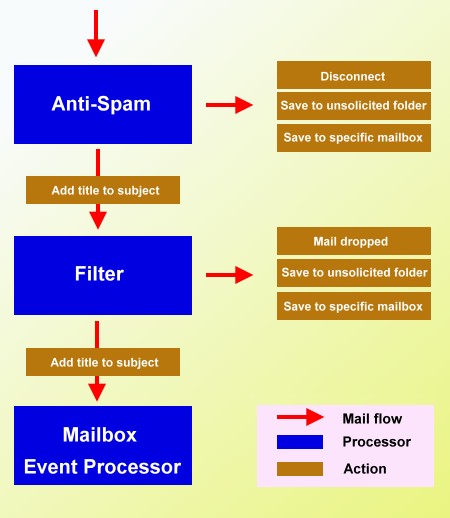
Spam mail rule
There are four mail rules for SBL-XBL, SORBS, DSBL, REVERSE to handle spam mail. They are
- Disconnect immediately and cancel receiving
- Receive it. Add warning string to subject
- Receive it. Save it to user's unsolicited folder
- Receive it. Save it to specific mailbox
The mail flow is like below
Interactive Sender Verification
Interactive Sender Verification (ISV) is an awesome spam/virus-blocking mechanism.
This mechanism will send verification mail to the sender to confirm his identity. If the sender is a real person and has a valid email address, he can receive this verification mail, read it and input the number to confirm his email address to be a valid sender email address for your user. After a valid verification, the sender email will be added into your user's white list and he will not need to do the verification again as long as his email address is still in your user's white list. Your user also can edit the white list on webmail at will.
This mechanism always works with webmail. Therefore, the admin needs to open webmail service to make ISV works. Without webmail, the ISV mechanism will not work correctly and users also can't check the <unsolicited> folder or verify mail manually on webmail.
Sender Email for ISV mail : Define a non-existing email address in your mail server to be the sender email for ISV verification mail.
ex: sender-verifier@<your email domain>
ps: Why do you need to use a non-existing email address to be sender email? Because this way can avoid some looping situations when the sender mailbox has a "auto-reply" feature to reply every verification mail and your raidenmaild will also send verification mail for every auto-reply mail..
Verification url on webmail : This url is for sender verification purpose only. It is a page on webmail and its name is isv.html . The verification url in sender verification mail is pointed to this url.
ex: http://<Your webmail ip>:<Your webmail port>/isv.html
Delete expired unsolicited mails after nn days
This will delete those out of date mails which are in \-unsolicited- folder automatically. The checking is proceeded by external program - MailboxChecker.exe.
Enable daily Spam Mail Report
This is external console program - SpamListMaker.exe
SpamListMaker will take template file ( \templates\spammaillist.html ) to generate mail list report ( user's \-unsolicited-\*.eml ) to user INBOX folder.
User can browser the report html to delete mail/delete mail and blacklisted/move mail/move mail and whitelisted the mails in his \-unsolicited- folder via spam.html page on webmail.
Before using this feature, you should modify the url in spammaillist.html to pointed to spam.html on webmail.
Preference(1)
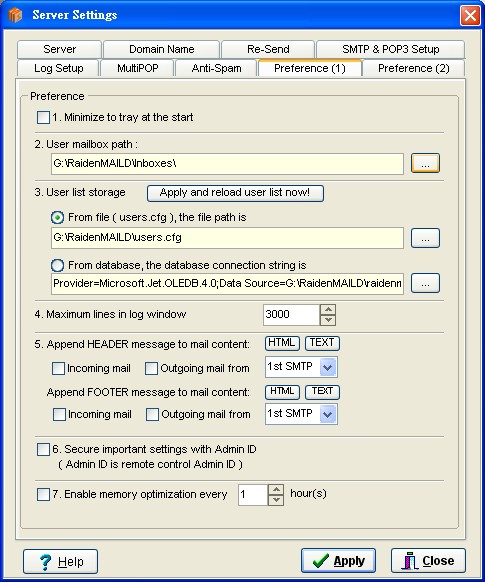
Preference setup is for miscellaneous options .
Minimize to tray at the start
Minimize RaidenMAILD to the system tray immediately after it starts
User mailbox path
You can specify the full path of your users' mailbox directory.
User list storage
You can choose which media to store your user list, text file or database.
Maximum lines in log window
You can specify maximum log lines in main log window.
Append HEADER / FOOTER message to mail content
You could specify any message (TEXT / HTML) to append to mail body. After the append message template files modified, server needs to restart to take effect.
There is a special feature working based on footer message. It is called Auto Receipt. (Tutorial)
Secure important settings with Admin ID
If you enable this setting, you will need to pass the authentication with the Remote Control Center Admin account first when you want to setup Server settings & User Management.
Enable memory optimization
This function is for the admin to configure the frequency of memory optimization. The recommended value is 3+ hours.
Preference(2)
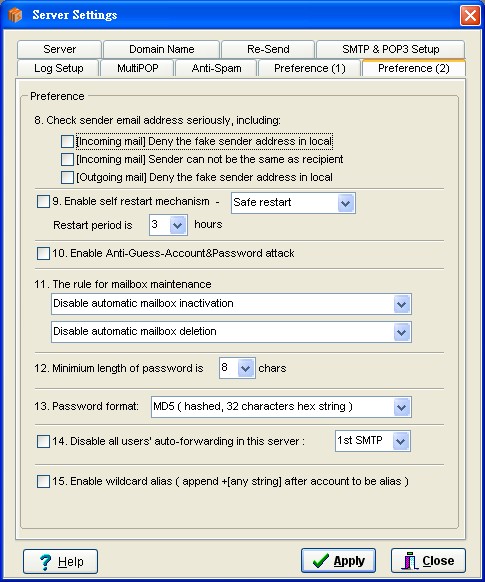
Check sender email seriously
This option will ask system to check sender email more seriously, including:
- [Incoming mail] Deny the fake sender address in local
- [Incoming mail] Sender can not be the same as recipient
- [Outgoing mail] Deny the fake sender address in local
Enable self restart mechanism
This function will let the server to restart itself every [nn] hours automatically without admin's intervention. There are two types of retstart modes. One is Safe Restart; it will restart the server only when there are no users online. The other one is Force Restart; it will restart server even when there are users online. The minimum period allowed is 3 hours.
Enable Anti-Guess-Account&Password attack
This feature will temporary deny those IP Addresses which attempt to guess password or account ( more than 5 times within 10 minutes ).
The rule for mailbox maintenance
You can define the rule for mailbox automatic inactivation / deletion.
Minimum length of password
Define the minimum length of password. As we know, longer password is higher security.
Password format
This option will determine which format to store password. There are four types:
- Raiden (Original raidenmaild hashed string)
- Plain Text
- Base64 encoded
- MD5 (MD5 hashed, 32 characters hex string)
Disable all users' auto-forwarding in this server (1st SMTP / 2nd SMTP / All SMTP)
This function can disable the auto-forwarding for SMTP service. You may enable this function to avoid forwarding twice while your server is dual smtp services enabled.
Enable wildcard alias ( append +string after account to be alias )
This option will allow user to create any alias if he needs. Just append +string after his account name and before "@".
Ex: Suppose user's mail is info@abc.com.tw, he could use info+shopping@abc.com.tw as alias email and leave this info at shopping mall. If anyone sends a mail to info+shopping@abc.com.tw, it will send to info's mailbox. Then when you read this mail, you will know the origin of the mail by the recipient email (info+shopping@abc.com.tw).
< Back to Index
RaidenMAILD Official Site: http://www.raidenmaild.com
Copyrights, Team John Long. All rights reserved. |

